Thursday, December 23, 2010

Our First Christmas Tree!

Growing up we never had a real tree. Not that we didn't have a place to get them, but I grew up in New York and we never really felt like trudging out into the snow to find a tree when there was a perfectly good one in a box in the attic. (We also never really felt like cleaning up after a real tree.)

Fiancé has always had a real tree. I can't say that I blame him with how beautiful the weather is down here in Atlanta around tree hunting season. 

Just look at that. No snow, no slush, no muddy ground. Perfect!

This is actually our second Christmas together though the first that we've been able to spend at home. Last year in December  2009 my Fiancé (then Beau) was admitted to the Hospital for double pneumonia and Swine Flu. He was put on a respirator for almost three weeks. Two similar cases that had come in before him had died from the same sickness. The doctors warned us that he might not get well at all.

I'll tell you that I've never been so scared in my life. I have never prayed as hard as I did those three weeks, but on December 21 of last year we were blessed with a miracle. The CDC allowed for emergency use of an experimental anti-viral drug called Peramivir.  On this day exactly one year ago my beau was taken off the respirator and was on his way to recovery. The drug literally saved his life. 

Last year was the best Christmas ever because God brought my love back to me. I'm thankful every day and every time I see Fiancé's smiling face. This year we wanted to celebrate his recovery by celebrating Christmas like we were unable to do last year. We wanted to get our first Christmas tree.

The weekend after Thanksgiving we went searching at our local tree farm.

Most of the trees were a little too big for our house as we do not have 15 foot ceilings.

 Nope, still too big.

We must have spent an hour walking through rows and rows of trees.

But finally decided on this guy, a 7 foot tall Leland Cypress.

Fiancé made short work of the chopping.


The hunter and his trophy.

 They even baled it for us in fancy red & green Christmas baling netting.

 Fiancé did most of the work though...

Next they hooked the tree to the car and we headed home.

 The Christmas tree arrives!

 We removed it from it's baling net.

We propped it up and gave it lots of water.

Then it was time to string the lights. We were a little short on lights so we had to take a short break to go get more from the local Target.

Fiancé hung our first ornament.

And I hung the second. Right there. See, right there. There.

Fiancé even surprised me with this cute little Belle ornament. Favorite princess, hands down.

A few hours later we had our tree decorated and complete. It smells fantastic and I love it!

Happy Holidays everyone! I'll be out of touch for the next few days, but I hope you have a great holiday season and I'll see you next week!

Wednesday, December 22, 2010

I have a secret

Dear Readers,

I have a secret. A nasty little secret.


I suffer from chronic tendinitis. Mostly in my right wrist.

Tendinitis is inflammation or irritation of a tendon — any one of the thick fibrous cords that attach muscles to bones. The condition causes pain and tenderness just outside a joint. While tendinitis can occur in any of your body's tendons, it's most common around your shoulders, elbows, wrists and heels.

I think I gave it to myself back in animation school. Being on a computer 10 hours a day trying to finish your 3D senior thesis film isn't the greatest thing for your wrists. Spending the rest of your day drawing, tracing, inking, and typing papers certainly doesn't help. When your wrists start to hurt and you work through the pain to finish assignments... well, you get where I'm going here.

In any case ever since art school I've had bad flare ups. They mostly involve massive pain in one wrist or the other, the need to wear a wrist brace, and copious amounts of anti-inflammatory herbs. There have been fewer and fewer periods of pain lately because I try to take good care of my wrists, but every once in a while I have a major flare up. During these times I'll even resort to ibuprofen which anyone who knows me will know that that I don't take pharmaceuticals unless I am in major major pain.

So to give you an idea I have taken four Motrin this morning on top of my herbal regimen. It hurts, my friends. In fact I've just typed this whole post to you with one hand while the other one is being iced with an ice donation from the lovely cafe next door. I won't be finishing my sister's handmade sweater for this Christmas and it's killing me. I hate to resort to a store bought gift for my sister when her sweater is literally two hours away from being finished. It's really killing me and I feel like a horrible sibling for not finishing it sooner.

So my secrets out, Dear Readers. When I stop sewing for weeks at a time you now know why. I'm probably nursing a hurting wrist and my hurting pride.

Do you suffer from similar ailments, Readers? Do any of you bloggers suffer from tendinitis or another blog interrupting ailment?  What do you do when you can't sew?

Monday, December 20, 2010

Updates, updates, updates

Point 1. Look what I picked up yesterday!


A super cute pillow from Mrs. Eleanor over at Unfamiliar Ceiling. You might remember Mrs. Eleanor from the Ruby Shorts Sew-along a few months back. She's also one of the recipients of a secret surprise if I ever make it over to the UPS store. Things have been nuts around here, but I suppose that's the holidays. With the layoff my whole world got turned upside-down and we're still trying to righten ourselves. Don't get me wrong- I love seeing family and friends over the Holidays! But darn if I haven't had a night at home since November...


But anyways this cute little pillow is going right into my sewing room. It's really too cute. If you like this pillow I suggest you check out her etsy store. I especially love her line of Matryoshka plush dolls.


So cute! I think these would be cute stocking stuffers for a little girl (or not so little girl) that you know. This month has been a little rough for her family and I'm sure they would appreciate any business you could send their way.

Point 2!


The New Vintage Lady posted a nice tutorial about dying your own cotton stockings. I actually didn't know that dyed stockings were popular for young ladies in the 1940s. Awesome!

Point 3!


Regan over at Stitch-In-My-Side is running a Burdastyle sew-along. If you've never read any of Regan's tutorials you totally should. They're very clear and she includes lots and lots of pictures. The subject for this sew-along is the Marie skirt. It's a free pattern so it's a great way to use up some of those misc yards of fabric you've got lying around.

I plan on jumping into this thing, but I've got my own ideas about how I want mine to look. I've already decided to replace the waistband with some wide elastic, but I'm really looking forward to Regan's tutorials and howtos. Oh and did I mention the pattern is free? How can you say no to that?


Point 4!

I might have found THE dress while wedding gown shopping last night. I can't post a photo because Fiancé reads this blog from time to time, but I can tell you it has a great Hollywood feel to it. I've got a few more shops to hit before I make the purchase so it may not be the one, but I'm feeling pretty confident about this one.

Thursday, December 16, 2010

The plot thickens?

For those of you who haven't been reading Tuesday's autochrome post's comments the Vintage Baroness and I have been debating over the time in which two of the Autochromes were created. Mrs. Baroness is a fabulous vintage dealer so I very highly respect her knowledge and opinions on the matter, but other than deciding that that one photo was very likely incorrectly dated we've still been pretty stumped.

I did manage to find out some information about the autochrome titled "Man and women carrying suitcases" by Charles C. Zoller. The catalog date on this photo is 1907 - 1932, but I'd like to narrow it down a little further.


My first thoughts were that this was a photo from the late teens or very early twenties. Based on the cut of the dress and the man's sweater/shirt combo. The Baroness suggested that this dress may in fact be an maternity dress and that the frame under the woman's hat looked like a 1930s horsehair type thing.

I became very excited at the thought of this lady's dress being a maternity dress because the thought had not even crossed my mind.It meant that this photo could very well be from the early 1930s, but I was still not convinced that this photo was from the late 20s/early 30s based on her lack of cosmetics. Of course not all ladies wore cosmetics, but with a color photo being such an expensive and time consuming process I highly doubted that a couple would spend the money on one and the lady would not bother to use some rouge.

Then the thought hit me that perhaps these people were friends or relations of Mr. Zoller's. So I went over to the George Eastman House online archives to do a bit of hunting. There are probably at least a hundred of Mr. Zoller's autochromes in the Eastman House collection and I knew that a good portion of them were online. Well, with a bit of luck I was able to find this photo of the same couple (with some unknown man on the porch) among a bunch of Mr. Zoller's personal photos.


The photo is titled "Couple leaving for honeymoon" and dated to the same time as the first photo. To me it is very likely that these people were part of Mr. Zoller's personal life, though I cannot say how. It's highly unlikely that this lady is wearing a maternity dress if they are leaving for their honeymoon so my first reaction was to go back to my original thought that this photo was snapped in the late teens. Of course than I noticed their shoes and now I'm not so sure of my original estimation.

The moral of this story is that I really have no idea when this photo was taken. I'm still trying to find the answer so if any of you have any wisdom you'd like to impart that might help me out here, please do so!

Tuesday, December 14, 2010

Autochromes!

So today is the day that I have been looking forward to for a loooooooooong time. Autochromes!

Anna Stocká by Josef Jindřich Šechtl ca 1909. This photo is the earliest known autochrome of Šechtl's. The lady in the photograph is his future wife Anna. This is my favorite autochrome of all time and it is currently in the collection of the Šechtl & Voseček Museum of Photography. I am especially fond of the soft pale blue color of her dress and her beautiful wide brimmed hat.  

I'll start with an explanation of what an autochrome is. An autochrome is a color photo printed on glass using potato starch. Crazy right? The process was invited by Auguste and Louis Lumière (the same Lumière brothers who invented the motion picture camera the cinématographe). The process was patented in 1903 and was used as late as the 1930s.

The process used a screen of tiny potato starch grains dyed orange-red, green and violet. The grains were dusted onto a glass plate and then covered with a layer of panchromatic silver bromide emulsion. As light entered the camera it was filtered by the dyed grains before it reached the emulsion. The exposure time for one of these images was very very long, but the result was a semi opaque positive color image on glass that required no further printing.

Close up of Autochrome approx 1911
While working at the George Eastman House International Museum of Photography and Film I was very fortunate to get to look at some autochromes up close. They need to be viewed on a light table to be seen properly, but I can tell you that the colors are even more vivid and stunning than the images in this post. It is very difficult to reproduce autochromes as digital files true to color because of the nature in which they are printed.

Autochromes are composed of a series of tri-colored dots (as you can see in the image above) that work like a video screen. Because the dots are so small and so closely packed together the colors of adjacent dots blend together in our eyes. Light from neighboring red and green dots will create a yellow color and like from violet and green dots will make a light blue. Neat, right?

I've included some of my favorite autochromes here, but I strongly encourage you to do a quick search online for others. It's amazing how well these images have held up over time and I just love getting to see the actual colors of frocks from the 1900s and teens!

Couple ca. 1910 by Mrs. Benjamin F. Russell. 
This lady is subscribing to a more relaxed fashion than the lady at the top of his post even though the photos were taken at relatively the same time. She's equally stunning in my opinion. I love the color of her frock, the simple cut, her matching pink scarf, and her cute hat. What do you think, Readers? Is that an engagement ring on her finger there?

Woman wearing red dress with houses in background ca. 1915.
 I find her up-do to be very lovely and her shoes to be very charming. It's a little hard to see but she is wearing a high lace collar and sleeves with lace cuffs. There are a ton of little button details up and down the front and sides of her dress that remind me of traveling coats from this era. I'm not sure what this frock is made out of, but the fabric is obviously quite thick and heavy. Canvas maybe? The way the fabric wrinkles around the skirt hem makes me lean more towards a heavy plant based fabric than an animal fabric.

Dancer wearing Egyptian-look costume with wings reaching to the floor ca. 1915
This would have been at the height of Egyptian fever, though still previous to the discovery of King Tutankhamun's tomb. As with most images from this period I could find out very little information about the woman in the photo and why she might be wearing this getup. Perhaps she is a dancer, though for what type of production I couldn't say.

Cowgirl by Mrs. Benjamin F. Russell  ca. 1910.
I love her! I love this image!  This autochrome is in the George Eastman House collection, Rochester, NY. I love her big hat and giant rodeo pants. I suspect this is more of a masquerade outfit or show outfit than actual work clothes, but I'm totally cool with that.

Lady Helen Vincent by Lionel de Rothschild ca 1910.
Lady Helen was apparently a society beauty and wife of the diplomat Sir Edgar Vincent. I am swooning over her beautiful pale pink dress with the lace sleeves. Just look at the lacy detail down the front of her skirt and the black belt around her waist is so classy.

Man and women carrying suitcases by Charles C. Zoller  ca 1907 - 1932.
I'm going to go ahead and guess that this print comes from 1918-1922 based on her dress and his sweater and tie. The only thing that keeps me from pinning this a few years later is the lack of make-up on her face. The early 1920s saw a huge swell in make-up usage with the widespread post-war availably of cosmetics. What do you think, Dear Readers? What time might this couple have lived in?


Unknown photographer, subject, and date... but wow. Just wow. Look at that dress! And look at those plumes on that hat! Look at that lace on her blouse! If this lady's attire doesn't scream fashion I don't know what does. Makes a girl want to start making Edwardian clothing doesn't it?

Seneca Pool 1924 ca. 1924
I really love these cute 1920s bathers. This pool was actually located not too far from where I went to college, but it has since been filled in. Look at how the ladies are mostly in dark wool swimsuits, but they wear brightly colored swim caps. I didn't realize that there were so many different cap color options when I wrote my 1920s swimsuit post. You learn something new every day. 

Friday, December 10, 2010

Mending Mens Clothing: A Hole in the Front Pocket

Welcome to the second installment in my Mending Men's Clothing series.


Today's culpret is the same pair of pants as my last mending post, but this time we're dealing with the right pocket.


This time not only has the leg seam come apart, but the pocket has developed a nice little hole. To note, the last time the seam came apart above the pocket reenforcement. This time it came apart below it.  


This is the inside of the pants. You can see where the pocket lining has worn and come apart from the pocket. The pocket is on the left and has the brown boarder. The side seam of the pants has the serged edges in the upper right corner.

There are a couple of ways to deal with a hole in a pocket. I tried to refer to the 1946 edition of Mending Men's Suits by Clarice Scott and Anne Hagood. Unfortunatly they didn't really have much to say about this particular problem so I totally winged it.


This first step is the same as with the left pocket. You need to remove the stitches holding the pocket to the seam allowance of the side seam of the trousers. In the photo above the side seam has been removed and the two serged edges belong to the front and back pieces of the right leg of the trousers. 

Next trim off the frayed bit of pocket lining. You'll need to rip out a few stitches on either side of the tear to get the cut as straight as possible. 


Afterward you can do one of to do one of two things. You can remove the brown pocket edging, align your pocket pieces, reseam the side of the pocket and then resew the pocket edging around the outside. That would be the right way to do it. 

The wrong and lazy way (i.e. the way I did it) is to fold the newly trimmed pocket under and whip stitch or back stitch it into the pocket seam binding to hide the fact that you didn't take the above steps. (Hey, it was late okay! And I wanted some sleeping time... don't judge me.)


To finish up you just need to resew your side seam. Again it would be better to do this with a machine as far as looks, but this time I hand-stitched. You can be a little less exact when doing repairs on the inside of your trousers, but I do recommend using a back stitch if hand-stitching so it hides better among the machine stitches. Over lap the stitches that have not come apart by about half an inch to keep the seam from coming apart again. 


Complete your repair by reattaching the pocket to the seam allowance of the trousers. 


And you are done, my friend. Congratulations. Press your seam to get it flat and you'll never know that there was a problem. 

Wednesday, December 8, 2010

Mending Mens Clothing: Pocket Wear

So I was thinking just this morning that there seems to be a distinct lack in the amount of information out there on mending clothing and there is less information on mending men's clothing-- particularly things like men's suits.

Well Fiance is an Attorney and so he spends most of his time in one suit or another. Considering they are his Monday through Friday work wear (and then his Sunday wear too) they get a lot of bumps and scrapes along the way and often need mending for one reason or another. I've had to learn a lot about suit repair in the last two years.

I know a lot of us have special men in our lives and they are often a little rough on their clothing. Though daily suit wear is much less common for the male persuasion than it was even 30 years ago I think more than one of us will have an occasion to mend a pocket or a worn knee at some point. Getting a tailor to do the repairs can get awfully costly.

I always seem to be mending Fiance's clothes so I thought that as I find things to fix I'll share the repairs with you. Most of what I've learned has been from studying clothing, reading old mending pamplets from the 1940s, and guess work. I may not have the best or the prettiest way to repair men's clothing, but I hope you all find these helpful.

Today's Culprit, a pair of suit slacks with two worn pockets.


Today's pocket was the left hand pocket.


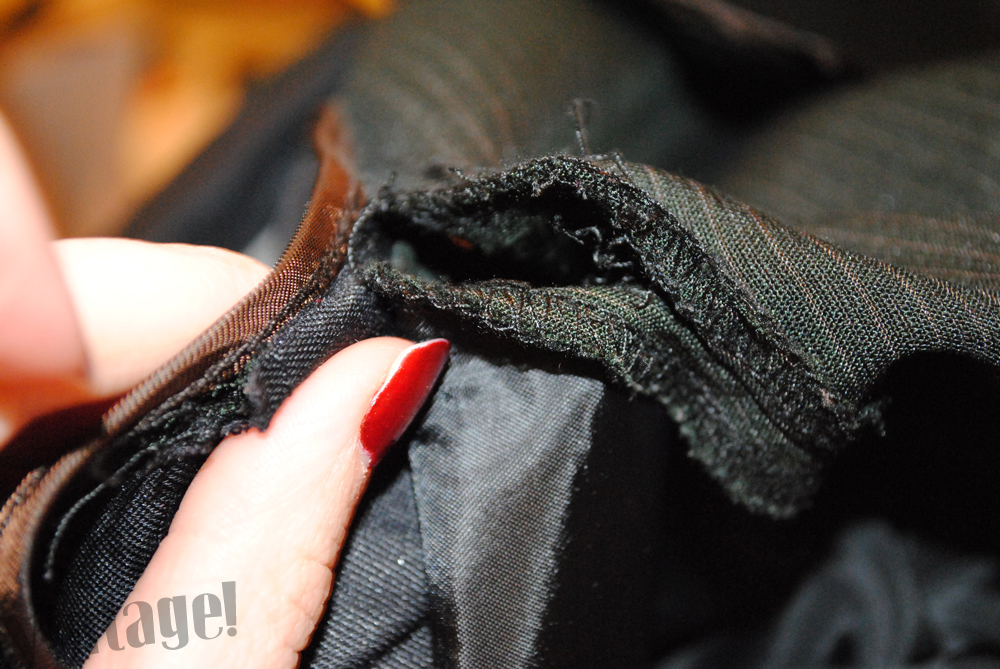
This is pretty standard suit pocket wear. It eventually happens to all pockets and arises from general pocket use. The stitching has just popped at the bottom of the pocket there (I'm holding the pants up-side-down) and the side seam has pulled apart. There are no holes in the pocket and the outer fabric has not frayed so this is a pretty easy repair.


It's a little hard to see and I probably should have drawn some arrows on this picture, but the side seam of the pants is the long seam running from the top to the bottom of the picture. To the right of the side seam is the pocket opening and the reinforcement.  So, how do we go about fixing this issue?

The easiest thing to do is stitch up the seam from the outside like you would when you're finishing a pillow, but the results are not the nicest looking. It's hard to get the seam flat and it doesn't hold well. 


So I recommend that you flip the suit pants inside out and find where the pocket has been attached to the seam allowance of the side seam. This is if you are fixing a front pocket. Back pockets on men's suits tend to be free floating. The brown in this photo is the edging of the pocket. The serged bit attached to it is the side seam.


In my experience there will almost always be a separate row of stitching where the pocket has been sewn down to the seam allowance. Take the time to figure out what row of stitching it is. Trust me, it's a pain if you start ripping the wrong ones. On this suit it was the row of stitching between the top row of stitching (which is from the pocket facing) and the stitches holding on the brown binding, 


Get your seam ripper in there and start ripping out just the stitches attaching the pocket to the inside of the suit.


Be careful not to catch any of the serger threads if your suit has them. It can get a little hairy since you're going to have to rip around the pocket stitches, reinforcement stitches, serger stitches, and then of course the seam itself. 


Okay so here I've got the pocket pulled away from the side seam and seam allowance. After you've pulled the pocket back you should be able to see where the seam has pulled apart from the inside. 


Next bust out your thread and 1940s sewing needle (which are awesomely sharp, but really hurt when you poke yourself with them). I don't like to use beeswax on my thread, but it's certainly an option.


Stitch up the seam making sure to reinforce around the top and the bottom of the opening. I like to use the back stitch for this, but the blanket stitch works pretty well too.


When you've got the seam all sewed up reattach the pocket to the seam allowance.


Make sure to overlap the stitches you didn't rip by about half an inch. It looks best if you use your machine for this, but I didn't really feel like changing my bobbin today so I did it by hand. I used the back stitch again so I could hide the stitches in the machine stitches that were already there. All you have to do here is keep the pocket from moving so you're stitches don't have to be super strong. They just have to be able to keep the pocket in place. Even plain old straight stitch would work here.


New line of stitches on the pants-front side. I hid it in the bottom line of the serger stitches.

And here they are on the pocket side. You shouldn't really notice the repair, although honestly this is the inside of a pair of pants so who really cares right?

And you're done! Pretty simple right? Who needs a tailor? Not my man.