Showing posts with label 1940s. Show all posts

Friday, July 22, 2011

A Brief History of Men's Shirts from 1900-1949

Something I've always been interested in as you know is the evolution of clothing. I'm always curious to know things like how this:
approximately 1840
Turned into this in a period of 20 years:
1860

Now granted men's fashion has changed a bit more slowly than women's fashion in the past few centuries, but we can all agree that it has still evolved fairly quickly.

1810
1910
2010
(Nancy note: This girl lived the next town over from me and went to my rival high school at the same time as me. She was even on our rival cheerleading squad. Please don't think any less of me...I promise no one else from that area talks like her.)
But all joking aside I could write a book on how men's fashion has changed in this century alone, but what I'd like to do today is talk about how a man's everyday shirt has changed since the beginning of the last century.

1900s:
Ca. 1900s (1907ish)
Here's an example of a pretty typical late 1900s shirt. There is a high detachable wing collar (rounded) and two cuff options. The sleeve plackets are pointed and the yolk is straight. This is what is called a "coat shirt" because if the fact that it opens all the way down to the bottom and can be slipped on like a coat.


The type of work shirt you wore, like today, depended on what you did for a living. Business men typically wore suits and white shirts of finer material while day laborers wore more colored shirts of much sturdier fabric (color hides stains and dirt). A man had many shirt patterns and colors available. Polka dots, double stripes and single stripes were popular as well as the traditional white.

Both acceptable shirting fabrics. 

Collars came in detachable variations like the shirt pictured above and rarely softer attached collars. In the early 1900s collars were much more popular as they increased the longevity of the shirt. Shirts were still yet to be mass produced and a gentleman typically had less than a weeks worth of shirts in his possession at any given time. You will also note above that the collar is quite high. This is left over from the late Victorian era, but as we approached the end of the decade shirt collars start to shrink in height.

1910s:

 late teens (source)
So this is a Negligee shirt or what I would call a semidress or casual shirt. It is not a night shirt. That's something completely different. (Nancy note: the term negligee doesn't become associated with bedroom attire until 1930s.) This shirt also has a detachable collar option and what's called a front-plait opening down the front. The placket ends a little more than midway down the shirt and the shirt is meant to be slipped over the head, though the pattern does give you the option to make it a coat shirt. The neckline is still quite high, but lower than the previous shirt. The rounded collar was still the more popular style at this time, but it would be going out of fashion shortly.

There are two versions of the shirt pictured above. The far left is the negligee version, the center collarless version is what's called an outing shirt. This shirt could also be considered a work shirt if it was made with a sturdier fabric. The type of shirt at this time was determined mostly by the fabric used. Lighter fabrics for casual wear, slightly heavier fabrics for casual wear, and sturdier still for work shirts. The pointed yolk was typically found on casual shirts like these, but on occasion it would pop up in more formal wear.

From a Guild to Making Shirts reprinted 1928 

Many colors were still popular at this time. Stripes, half stripes, and even on occasion checked fabrics were worn.

1920s:
Early 1920s
This shirt features a slightly more modern look. You still have the option for a detachable collar, but the main image of this pattern shows a pointed attached collar. Even the detachable collar is slightly pointed. The shirt again gives you the option of coat shirt style opening or front-plait style opening. There are two cuff options including a detachable reversible soft cuff.

During the 1920s the silhouette of the shirt begins to change due in part to improved manufacturing techniques. Shirts become more fitted, with straight fitted sleeves. French cuffs are the norm. Pointed soft attached collars become more and more widespread thanks to the invention of the home washing machine. Rounded detachable collars are still popular among the older population, but for the trendy folks pointed collars become the normal shirt for business wear. They were secured with collar studs or pins and a tie. Detachable collars are still popular among day laborers for their ease of care and increased shirt life.

1930s:

source
Now we're cooking with gas, as they say. This is really starting to look like today's men's shirt. This pattern only gives the option of the coat shirt opening. Plait-front shirts are pretty much obsolete. The placket still ends quite high on the shirt, but this is in accordance with the pants style of the 30s in which a high waist was preferred.

French cuffs, pointed sleeve plackets, and a longer shirt collar point are all features of this particular shirt. Also popular at this time. Collar stays!


Which were really more like tie clips, but still amazingly effective. Clip stay to tie and each side of collar and voila! Collar stays put all day long. Genus says I.

1940s:

The 1940s bring with it an explosion of different styles of shirts. Shirts become more and more casual. Short sleeve shirts are very stylist for casual wear, sport wear and even work wear.


Fabric choices explode. Flannel, cottons, rayon, prints, prints, prints, and more prints all become popular for work and casual wear.


Western shirts become popular in the late 30s and into the early 40s. This is caused the increased popularity of western movies and stars like John Mack Brown, Red Berry, Harry Carry, Jr. and more. I have a secret love for these, but Mr. Fiance has promised me he will never wear one. Bummer. 


The button down business shirts stay about the same. Detachable collars disappear and the softer pointed collar firmly cements its place in men's fashion. Shirt tails become shorter and plackets extend as the waist on men's pants lowers.

And that, my lovely friends, is that. If you found this helpful drop a comment in the comment section below. Next post: 1950s-1960s.


If anyone was confused by some of the terms I used in the post here's a helpful diagram.

source


Additional References and Some Good Supplemental Reading Recommendations:

Wednesday, July 20, 2011

I got a present!

I am always always amazed by the kindness and the generosity of others. Especially when I head to the post office and find this in my box:


It was a huuuuuuuuge box of patterns from Ms. Contessa Timmerman. The box was just packed full of patterns from the 1940s all the way up to some that are less than 10 years old.

By the way Ms. Contessa I just love your handwriting:


I took them out of the box and laid them in my front entry way so I could examine them all. First of all, Contessa, you have excellent taste. And second, would any of you believe me if I said this wasn't even half of what she sent me? I was completely blown away.


This was my personal favorite pattern as bridal gowns are a subject that's currently very near and dear to my heart.


I also loved this really sweet Butterick dress which I had never seen before and this Advance gardening apron which I may or may not have already busted into and cut out the fabric pieces for....


She also sent lots of patterns from the 1960s including this sweet little sundress. Or at least what will be a sundress when I get through with it. Probably in sunny yellow floral print.


Here are a few more of the other great 50s and 60s patterns she included. I also love the 1970s shorts pattern that you can see peeking out on the far right side below.


Lots of full outfit patterns and this great pattern which included interchangeable collars.


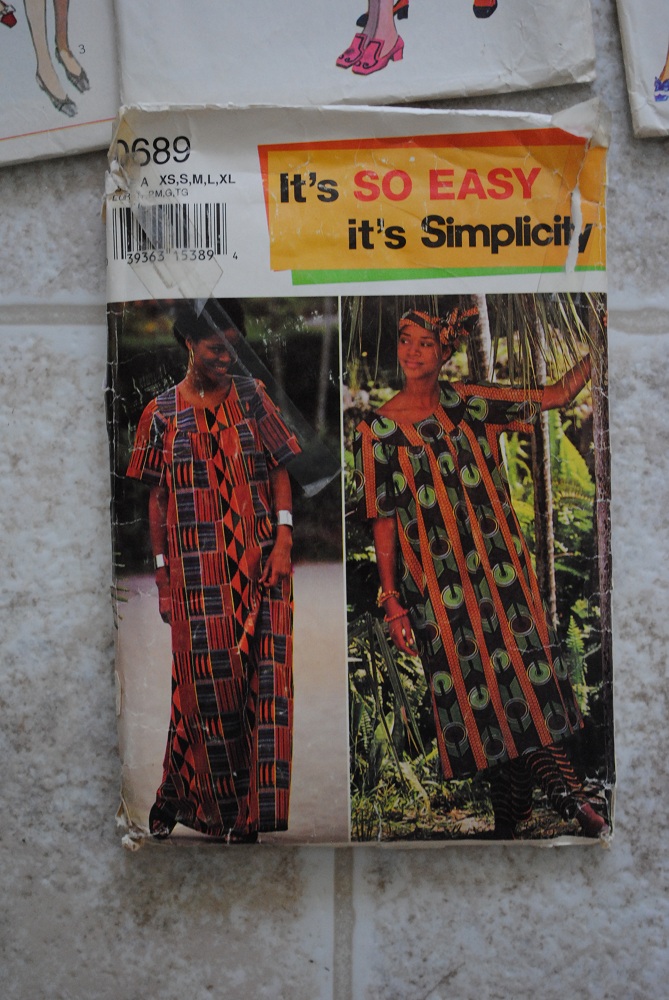
and I now have another caftan pattern. Which is awesome.


So thank you so much, Ms. Contessa. I'm overwhelmed by your kindness and I am definitely going to be busy for the next six months making all these lovely garments. All I can say is thank you thank you thank you and I promise to take good care of these lovely patterns.

Best,
Nancy

Friday, July 1, 2011

Vintage 4th of July recipes and a crochet pattern.


It's almost the forth of July which means that we can all look forward to a day off from work (if you live in the USA and your office actually gives you the day off). It's a day to spend time with friends and family and to eat delicious food. In celebration of one of the more fun holidays of the year (in my humble opinion) I busted out a bunch of my old cook books, personal recipes, and craft magazines to find some old school summer picnic fare. Some are a little odd, but some are pretty good. If you happen to try any of these recipes drop a comment and let me know what you thought of them.

Pear and Banana Salad
From the Workbasket July 1953 edition. 
For each serving arrange 2 pear halves on salad greens, one with cut side up, the other with cut side down. Peel banana, run tines of fork lightly down sides. Cut into 1/4 inch thick slices and arrange in half circle over-lapping slices in front of the pear halves. Garnish pear with a cherry or other berry and serve with a tart or sweet dressing.

Sweet Dill Pickles
From the Workbasket July 1953 edition.
- One Quart Dill Pickles purchased in store
- 2 cups sugar
- 1/2 cup terragon vinegar
- 1 tsp celery seed
- 1 tsp mustard seed
Wash and drain cucumbers, cut into chunks. Mix all other ingredients together and bring to a boil, remove from fire, let cool, and pour over chunked pickles. (Nancy note: This sounds awesome, though so not on the Bomber Girl diet plan... alas, maybe next year.)

Cherry Coke Salad
Date unknown, recipe from private collection originally obtained from Charming Vintage Recipes. 
- 1 package of cherry or black raspberry jello
- 2 cups water
- 1 12oz coke
- 1/4 cup cold water
- 1 #2 can crushed pineapple
- 1 #2 can bing cherries (Nancy note: #2 cans = 20oz)
- 2 small packages cream cheese (Nancy note: small package = 3oz)
- walnuts
Heat water and add jello to dissolve. Add 2 cups coke/cold water. Drain fruits and discard liquid. Add fruits, softened cream cheese and walnuts to jello. Mix, pour in mold, and chill.

Baked Beans and Lettuce Sandwiches
From Better Meals for Less Money (1917)
Press cold baked beans through a sieve; spread bread with butter, cover with a lettuce leaf, cover lettuce with beans, and sprinkle beans with chopped mustard pickle. Cover with a second piece of buttered bread. Brown bread or any dark bread may be used.

Apple-Lemon Summer Cooler.
Personal collection, ca 1950ish.
- 1 quart apple juice
- 1/2 cup fresh squeezed lemon juice
- 1 fresh peach
- 1/2 cup fresh strawberries
- 1/2 cup fresh raspberries.
Dice peach and strawberries, place with raspberries in bottom of pitcher. Add apple juice and lemon juice. Stir and chill. (Nancy note: I like mine with a little more bite so I tend to add more lemon juice, but it's really up to you.)


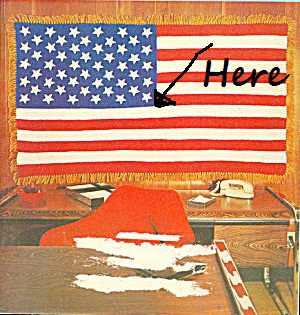
And just for fun I present this pattern for this crochet American Flag from the July 1974 edition of Workbasket. I typed out all the abbreviations and rewrote a few things to make the pattern more readable.

You all know you want that office. Don't lie, I know you do. 
American Flag
Yardage: You will need 20 ounces of white yarn, 16 ounces of red yarn, 12 ounces of blue yarn, and 4 ounces of gold yarn. All worsted weight.  (Nancy note: That's about 900 yards of white, about 760 yards of red, 570 yards of blue, and about 170 yards of gold. They're definitely using cheap scratchy acrylic for this so if you're going for historical accuracy go find some Red Heart value yarn.)
Gauge: 7 single crochet equal 2 inches
Hook: Size F

Work Begins on lower edge.
Base Row: Starting with red chain 218, single crochet in second chain from hook, single crochet in each chain across, chain 1, turn.
Pattern Row 1: Single crochet in each single crochet across. Chain one, turn.
Repeat Pattern Row until there are 11 rows of red. Fasten off (Nancy note: Fastening off is really up to you,  you can also carry the red yarn up the side as you go.)
Join white and work 11 pattern rows.
Continue Changing colors from red to white until 3 red stripes and 3 white stripes are completed.
Change to blue and single crochet across 109 stitches. Chain 1, turn.
Continue in blue until 77 rows are completed.
Join red in first single crochet after first blue row. (Nancy note: this might be a little confusing so I made a diagram.)


Work 11 rows of single crochet in red for first short stripe, fasten off.
With White, work 11 short stripe rows.
Work 4 red and 3 white short stripes.
Sew blue panal to edge of short stripes with small stiches. (Nancy note: Use whip stitch or blanket stitch.)

Stars: Make 50. With white chain 4, join into a ring with slip stitch.
Row 1: Chain 1, stitch 15 single crochet stitches inside ring, join to first single crochet stitch with slip stitch.
Row 2:* Chain 6, slip stitch in second chain from hook, single crochet in next chain, half double crochet in next chain, double crochet in next chain, treble crochet in next stitch, skip 2 single crochet, slip stitch in next single crochet, repeat from * around until you have 5 points. Join with slip stitch and fasten off leaving about 12 inches of tail to use to sew star on.
Sew stars on blue panel as shown in photograph (Nancy note: or like in any photograph of the flag), 6 in a row for 5 rows and 5 in a row for the 4 rows between them.

Fringe: With gold, cut strands about 6 1/4 inches long. Fold 3 strands in half and put them in every other single crochet around. Trim strands to even them out.

Tomorrow I bust out my Bicentennial magazines so stay tuned.

Tuesday, June 28, 2011

Stockings on the ration.

Sooooo I started this post about two weeks ago. 13 days ago if you want to get technical, but you know... I'm like that. My brain got sidetracked as it tends to do and I did things like paint and stuff.

Anywho today let us touch on my most favorite subject of subjects: Underpinnings. Specifically stockings. More specifically I want to talk about stockings on the ration; a subject that I've always found incredibly fascinating. No matter what was going on a fashionable lady in the 1940s still just had to have her legs covered.

I tried to think of something to equate this trend to in today's terms, but nothing came to me. The best I've got is today's requirement for toe nail polish with open toed shoes, but even that example doesn't really cut the mustard. Stockings had more to do with propriety. We were wearing shorter skirts and starting to lose the corsets and girdles, but stockings were still something that you just wore. According to my grandmother you found a way to get stockings during this time even if you didn't have much money for anything else. It was just something you did.

Woman wearing stockings in the 1940s
I still think all ladies should be wearing stockings, but that's just because nothing looks better to me than a lady's finely stocking-clad leg. (sidenote: Not being sexist, Dudes, but few men were wearing stockings back in the day. If you want to wear stockings today though I say go for it! It's 2011 baby!)


1933 Advertisement for Silk Chiffon Stockings. 
So rationing. Silk stockings were first rationed in the united states in 1941 due to deteriorating trade relations with Japan who had been our leading source of silk. Silk stocking production came to a halt. This meant that the stockings still available in the US quickly became very much unavailable. When the US did finally enter the war the military immediately began collecting used silk stockings to re-purpose into essential military supplies.  Parachute material comes to mind first, but it was also made into other war time items such as barrage balloons and powder balloons for navel guns. Apparently escape maps were sometimes printed on silk as well though I don't think that was taking up much of the supply.

Woman donated their damaged silk stockings in droves. A great show of patriotism says I! Those stockings that were undamaged were often reserved for very special occasions like Christmas or formal events and they were treated with great care.


The solution to the stocking shortage for most women was a switch to nylon, cotton or rayon stockings. (Though nylon became unavailable in 1942 when the War Production Board took DuPoint's complete nylon supply for the war effort.)

Ann Sheridan Shows off her cotton stockings during wartime.
Cotton and rayon stockings were not the complete solution however. The main problem with these types of stockings were that they didn't fit well and tended to sag around the knees and ankles. I've worn a pair of rayon stockings and I can attest to this. They also tended to be much thicker and therefore considerably less attractive.

Another popular solution was for ladies to literally paint the stockings onto their legs using oil based liquid makeup (typically MAC). They would then have a friend apply the back seam with eyeliner. Apparently the stockings could last for up to three days if the woman didn't bath or get caught in the rain. One also had to be careful when crossing one's legs as they could rub off.

Women painting stockings and back seams on legs. 
Interesting self seam application tool. Not totally sure why she needs to be standing on a stool for this, but you know. 
Another really interesting option particularly for women in the UK where makeup was far less available or for women who just couldn't afford the amount of makeup necessary was Gravy Stockings. Yes, you read that right. Gravy stockings. The technique was pretty simple. Boil down bones and left over bits of meat from dinner into a thick dark colored gravy and then paint away!


Here's a cute little video from a British show called horrible histories demonstrating this process (with a little less care than a lady would have used at the time.)


See you later, Alligators!

Monday, December 20, 2010

Updates, updates, updates

Point 1. Look what I picked up yesterday!


A super cute pillow from Mrs. Eleanor over at Unfamiliar Ceiling. You might remember Mrs. Eleanor from the Ruby Shorts Sew-along a few months back. She's also one of the recipients of a secret surprise if I ever make it over to the UPS store. Things have been nuts around here, but I suppose that's the holidays. With the layoff my whole world got turned upside-down and we're still trying to righten ourselves. Don't get me wrong- I love seeing family and friends over the Holidays! But darn if I haven't had a night at home since November...


But anyways this cute little pillow is going right into my sewing room. It's really too cute. If you like this pillow I suggest you check out her etsy store. I especially love her line of Matryoshka plush dolls.


So cute! I think these would be cute stocking stuffers for a little girl (or not so little girl) that you know. This month has been a little rough for her family and I'm sure they would appreciate any business you could send their way.

Point 2!


The New Vintage Lady posted a nice tutorial about dying your own cotton stockings. I actually didn't know that dyed stockings were popular for young ladies in the 1940s. Awesome!

Point 3!


Regan over at Stitch-In-My-Side is running a Burdastyle sew-along. If you've never read any of Regan's tutorials you totally should. They're very clear and she includes lots and lots of pictures. The subject for this sew-along is the Marie skirt. It's a free pattern so it's a great way to use up some of those misc yards of fabric you've got lying around.

I plan on jumping into this thing, but I've got my own ideas about how I want mine to look. I've already decided to replace the waistband with some wide elastic, but I'm really looking forward to Regan's tutorials and howtos. Oh and did I mention the pattern is free? How can you say no to that?


Point 4!

I might have found THE dress while wedding gown shopping last night. I can't post a photo because Fiancé reads this blog from time to time, but I can tell you it has a great Hollywood feel to it. I've got a few more shops to hit before I make the purchase so it may not be the one, but I'm feeling pretty confident about this one.

Thursday, October 14, 2010

$25V's Facebook debut!

Jacqueline Bouvier ca. 1947
Much like Miss Jacqueline Bouvier above $25V is having its debut. Except instead of in fancy dress at a lavish party we're debuting on facebook. Come be our fan won't you?


Remember that we have a new Google Friend Connect Box over on the right as well so if you prefer to follow blogs that way please check it out!

See you!

Tuesday, October 12, 2010

Vintage Beauty Tip Round Up

I finally installed a google friend connect box over on the right there. So if you prefer google friend connect to the blogger "follow" option or an rss feed, please check that out. 


Readers, I just love vintage makeup. I really only wear makeup in the 1940s style as most of my friends and family can tell you. It's easy, takes about 5 minutes, and looks super cute. Here, allow me to share today's makeup look with you via cellphone picture. I call today's look saucy secretary, though in actuality I am not a secretary. Enjoy the 1990s computer monitor behind me there. See, I'm so retro. Even at the office. Right...


Yes those are natural beauty marks (evidence), but I still like to highlight them with a little coal. Makes me feel very Marilyn. Maybe even double Marilyn? So intense? (It's still funny to me okay!) So you can imagine how much I love watching tutorials and reading blog posts about vintage make-up and styling. In the past week the blogging world has been blessed with some fabulous posts.


Lisa at Snoodlebug gave us a great little history lesson about manicures and shows off her fabulous nails. I love vintage manicures, though I admit I hate doing them myself. So hard to get those little creasants at the bottom right.


Fleur at Diary of a Vintage Girl gave us a fabulous fabulous video tutorial about creating that scrumptious 1940s lip. You might remember Fleur as the model from my post about Besame lipcolor.


Beauty is a Thing of the Past shared this neat article from 1938. What a pretty hair style I thought to myself, I sure wish I had the patience to create this updo. Maybe I'll do something similar for the wedding. Or maybe I just have a stylist do it for me. I like that plan better.


Couture Allure told us all about buying vintage stockings. I don't really do vintage stockings myself... mainly because I'm a stocking killer. I'm very talented when it comes to getting runs or getting my stockings caught on something, but do check this post out if you have any interest in vintage stockings especially if you're not sure what the different denier numbers mean.


And as a wrap up I'm going share with all of you the first official piece of my Wedding Ensemble. (Mr. Fiance, please avert your eyes).


Royal Blue Contrast Seamed Stockings from What Katie Did. $20.00 (You don't think that just because this is my wedding I wouldn't try to keep things under $25 did you?)

See you!

Tuesday, September 7, 2010

Last Guys and Dolls Post I Swear!

The director of the show, Ms. Tammy Barton, sent me some great photos to post on the blog. So sweet of her to give me these for $25V. She must understand the troubles of New Old Camera. Luckily for me and all my future projects my NEW NEW CAMERA came in the mail today. Holy SLR Batman! I love it!

Now I can request fancy lenses for the next few holidays and not have to strain too hard to come up with gifts. I know that sounds weird, but very rarely need anything. I'm pretty content to make do with what we have so it's always difficult for me to come up with things I want for gifts. Luckily (well, unluckily actually) my camera broke this year so my birthday present was easy to choose. Happy Birthday to me! In case anyone is mildly curious I hit 24 at 2:15 this afternoon. Now I can rent cars! Sweet!

Anyways, enough chatting! Here are the last of the Guys and Dolls Photos compliments of our director.

Better picture of the Hotbox Gals. Love my awesome show-girl headpieces. Very fun, super easy. Anyone interested in a tutorial?

Oh! Em! Gee! feathers! You can also see Nathan's maroon pinstripe suit here. Gotta love interesting menswear.

A much clearer shot of the general cast costumes. You can see the hilariously ugly wedding dress I created for the show on the left there. Love it!


Hotbox girl and Nicely-Nicely Johnson. Blue Pinstripes = awesome sauce!

More of the ugly wedding dress. The dress was a great find at $25. It was actually quite pretty before I chopped it up and added some tacky "bling."

Benny South-street. Tell me you don't love the powder-blue sports coat. 

And another shot of the guys costumes. Really loved doing the guys for this show. I could go really crazy with this show so I did. Plaid, Blue, Old Man Coats, Purple Pin-stripe suits. So good.

Hope you all had a great labor day! Anyone do anything fun? I went to Dragon*Con, but you'll have to wait until tomorrow for that post.