Showing posts with label Halloween. Show all posts

Sunday, December 5, 2010

"Logan Costume!" or "Halloween in December..."

Alright! The long awaited (at least on my part, maybe not on yours) Logan shirt post. I know this is a month over due, but I hope you'll forgive me.

The overall steps were pretty easy. I started with this pattern for the undershirt.


Which I'll note is just about the easiest darn pattern that there ever was. In fact, I'll share with you all the complete construction instructions. 


Sweet right? The first step was to cut out the pattern pieces. If you've ever used a stretch-and-sew pattern you'll know that the pattern is double sided and you always have to trace the pattern pieces onto pattern paper. I was sort of out of pattern paper at the time so I used some parchment paper, but halfway through the torso pieces I ran out of that so I switched to wax paper. I wouldn't really recommend wax paper for this job unless you get in a pinch like I did. It's not the easiest thing to work with, but it gets the job done.


There's nothing quite like jury-rigging. Yup. I have mad taping wax paper together skills.


The second step as you'll note from the pattern above was the sew up the shoulder seams. Since this was the undershirt and I was working with jersey knit I wanted to add some seam stabilization.

I do not buy store bought seam stabilizing tape for my knits. The tape is expensive and I find that a little bit of interfacing cut into strips does the job better than tape ever has. Plus it's a good way to get rid of all those interfacing scraps you inevitably have left over and it STRETCHES. Heck. Yeah.

I used fusible interfacing for this shirt because it was the only thing I had in black, but non fusible works pretty well as long as it's stretchy. Just stick it on top of whatever seam your sewing and proceed as normal.


After all the seams were sewn I ran a hot iron over the seam stabilizer/leftover interfacing to secure it a little better. As you can see in the above picture to save on fabric I cut the back piece of the shirt out of two pieces of fabric and sewed them together (top left). I left about five inches unsewn so I could add a closure later. My gray fabric was not very stretchy and would never have fit over Fiancé's head. Thus, velcro was a must.

I forgot to take pictures of the mock-turtleneck collar installation, but it was pretty straight forward. I cut a strip of gray fabric to 17 inches (the measurement of fiancé's neck plus one inch for overlap) by 4 inches. I folded it in half, sewed the ends closed, snipped off the corners, turned it right-side-out and pressed. After that I turned inside out again and sewed the right sides of the shirt and collar together. I turned the shirt right side out, folded the collar over and top-stitched the collar to secure it to the shirt.


And Presto! A mock turtle neck for your viewing pleasure. I hemmed the sleeves and added a velcro closure to the back of the shirt to finish it up.

The next step was to create the outer tunic. I started off by graphing all the triangle details into the front of the shirt with a ruler and some tailors chalk. When I had it the way that I liked it I went ahead and top stitched over all the lines. This took for-eeevvvv-eeeerrr, but was totally worth it.


For the tunic itself I took one of Fiance's teeshirts and traced it onto my black jersey. I added a 1/2 inch seam allowance on all sides and cut it out.


After I had all my tunic pieces ready I decided where I wanted the gray bar to go.


I subtracted a 1/4 inch seam allowance on the top and the bottom and cut out the black panel.


I used the cut out as a stencil for for the gray fabric and added an additional 1/2inch to the top and bottom of the panel to make up the difference.


I sewed the panel onto the front of the tunic and then attached the back of the tunic. To finish it up I hemmed the neck, armholes and bottom of the tunic.


I'm pretty happy with the outcome of the costume. There are a few things I'll go back and change before we wear these again.

1. Take in tunic arm holes a little more. I wasn't happy with how far they were poking out.
2. Adjust neck line on tunic so it doesn't cover up the bottom of mock-turtleneck. It's the wrong shape.
3. Finish the 70's pants that were suppose to go with this thing.

But otherwise I was quite happy. Our social circle is full of geeks and they certainly embraced our costumes.


I'd also like to note, Dear Readers, that I was just rehired to my old company! Hurray! And just in time for the Holidays. I'm thankful to my friends, readers, and especially my parents for helping us through the layoff period. E-hugs to all of you!

Monday, November 1, 2010

Halloweeeeen!

So we had all kinds of fun this weekend. Here are the final results. I was actually shocked by how many people knew who we were. I was expecting maybe one person or so to recognize us, but ten people must have stopped us to snap our photo. Fiancé even got stopped in the parking lot with a "hey Sandman!"

Once upon a time in the year 2116 a person's age is strictly legislated. 30 years to the day of your birth, Lastday, you must "renew". Those who don't renew are called Runners. They are hunted down by the elite police force called Sandmen.


Aaaaaaaaaannnnd the big reveal. We took this in a dark warehouse party so the flash did all sorts of stuff to our faces, but just pretend it's not so bad. I had to switch the Jessica belt up a bit, the o-rings I ordered came in too large. They were more like 3.75 inch rings than 3 inch rings. I'll be redoing the belt at some point, but I'm definitely going to have to get some smaller rings. Maybe 2 inch or 2.5 inch.  Also had a little costume malfunction. One of those rings decided it did not want to be attached any longer and flopped halfway off about 30 minutes into the night. It was my own fault for rushing the belt.


You can see the ridiculous quilting I did for the gray panel on the Sandman costume. Yes all those lines are stitched, not drawn. That was definitely the most tedious part of this whole endeavor. Fiancé really liked his costume and I have to say I'm quite happy with the results. The lifeclocks we bought looked awesome. I had to pull mine off at some point during the night because the Spirit Gum we used to attach them was really aggravating my skin and starting to hurt. (Curse you pasty white skin and your extreme sensitivity to everything). I solved the braless issue with pasties which also irritated my skin. Lame. Next time I wear a nude camisole like I was going to do from the beginning. 

I'll be posting how I made the Logan costume later this week. Hope you all had a great Halloween and have a  happy All Saints Day!

Thursday, October 28, 2010

Glorious Halloweens of Ol': The Bride

Today I take you back in time to the year oh, lets say 1992 or 1993. I'm guessing on the year, but I do remember that I wanted to be a bride for Halloween. Mom whipped up this cute little dress and even let me borrow her wedding veil! I loved this costume so much. I felt like a bride princess. A princess bride?


And for an added bonus I give you my first Halloween. This should be Halloween 1987 and I believe I'm dressed as a ballerina. My cousin (right) is a surgeon.


Have a safe and happy holiday everyone.

Sunday, October 17, 2010

Glorious Halloweens of Ol'

For most of my young life my mother made my Halloween costumes and she was a very good sport about it. I certainly had some weird ideas for costumes in my younger days (anything from a fish to a pink Belle alla Beauty and the Beast),  but she somehow miraculously always made them happen. I think this is halloween 1990, but it might be 1989. I wanted to be Grover. I hope you get a good chuckle out of it.


Did you have any strange costume ideas in your youth? Do any of your kids have some interesting ideas for their costumes this year? 

Friday, September 17, 2010

Cute Halloween Costumes

Tina over at What I Found has been posting some seriously awesome illustrations of costumes from a Pictorial Review catalog ca. 1925-1927. If you love the 20s like I do these are a must see!

Super cute pirate costume. A little risqué even.

I would totally wear that giant bow on my head. Just saying. 

Tree fairy maybe? Actually this is Pan according to the description. You know, Peter Pan (as if you couldn't tell the second you looked at this image.)

I would totally wear this right now. RIGHT NOW. Ruffles people! Ruffles..... The caption on the pattern illustration says "Colonial Girl," but I'm not sure how colonial this is. Looks more like what we would think of as "Little Bo Peep" today. 

Do check out Tina's Blog. She post all sorts of scans from her collection of vintage literature. They're always fun and interesting.

Thursday, September 9, 2010

Dissecting the Bunny Costume: Price Totals

Time for the Dragon*Con bunny costume totals! You too can dress like a vintage Playboy Bunny Girl on the cheap.

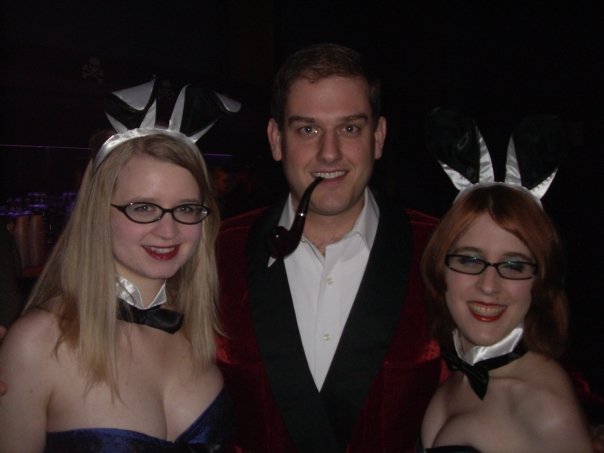
I will admit that this is not the first time I've worn this costume. It made it's debut last year around Halloween 2009. My Besty, Fiance and I decided that this would be a good group costume to wear to party that was being hosted in Atlanta. We found out about it about 2 weeks prior to the event so we had come up with something easy and quick.

Halloween Party in October 2009. Besty Stacey, Fiance, and Nancy (that's moi, with much shorter hair)
For me there are three important rules of costuming.

1. It has to be cute
2. It has to be cheap 
3. People must be able to instantly recognize who or what you are. 

The costume doesn't need to be completely accurate, but people need to "get it." So I always start off with lots of research. You know me by now. I'm a research whore amateur fashion historian. So the first step was to figure out what those Bunny Girls actually wore. Cue slides.


All Images pulled from The Independent
So after looking at waaaaaay too many pictures of scantily clad women I was able to determine the key pieces that really made the "look." I do this with every costume I make, but the bunny costume was easier to dissect than most. First you have the cuffs and collar. Next you have the strapless body suit. After that comes the ears. If you look at the images above you can see that the ears are different in each one. What that told me was that I didn't have to pay too much attention to those. The actual Bunny ears changed style and shape over time so no one would care if mine were a bit off.  The next element was the tail which had to be big. None of these little tiny cotton balls you see in costume shops. As you can see in the photos above the girl's tails were quite sizable. I knew I wouldn't find the tail I wanted in a store so I would need to construct one from scratch.


We had limited time so the best option was to make some pom-poms. Each tail took a whole skein of Caron Simply Soft (acrylic yarn you can snag at any big box craft store). It worked like a charm. The tails were nice and fluffy and thick. The yarn was $2.95 a skein, but for the purposes of this blog we'll round it up to $3.00.

Boy do I look hideous in this picture. Yikes. Stacey looks great though. 
The body suits were made from corsets already in our collections and cheap high waisted panties from Kohl's (about $3.00 each). The bunny ears, cuffs and collar were a set we found on the internet. I splurged here and spent $15 on those. The last steps were to add some black pantyhose (I wore tights for Dragon Con) and some black everyday/office heels that we both had lying around.

Fast forward back to Dragon*Con 2010. Oh yes, I look much better here.
So the Grand Total for the Bunny Costume.

    $15.00 : Ears, Cuffs and Collar
    $3.00   : Bunny Tail (Yarn)
    $3.00   : Black High Waisted Panties
    $4.00   : Black Tights
    $0.00   : Already had Corset
+  $0.00   : Black Work Pumps
    A little under $25.00

Sweet!

Happy costuming. Anyone have some great ideas for Halloween this year? I still haven't decided on costumes for myself and Fiance. If anyone has any suggestions for us let me know!