Thursday, December 1, 2011

This week we're making this.

I'm not completely sure why, but I've been invited to three Sexy Xmas parties in Atlanta this year. The first of which, XXXmas, is taking place on December 9. Am I really that sexy? Who knows, but I'll roll with it. If three different people invite me to a sexy party then it must be so! Or something like that. 

Why are there so many sexy Christmas parties in Atlanta you may ask? I have no idea, but I guess they don't call it Hotlanta for nothing. 

I wasn't completely sure what I wanted to wear until I found this little number on Trashy.com.


I would call this love at first site, but with a $200 price tag and an order processing time of 2 weeks it was not meant to be. Then it occurred to me: I have a sewing machine! So off I went to plot my own rip-off Trashy.com inspired version of this little number.

First task, find fabric. Seriously, this has got to be the hardest type of fabric to find ever. NO ONE has any sparkle stretch velvet. Even my normal specialty spandex provider did not have any in stock. So I headed out to the thrift store to see if I could find any used children's holiday dresses. I figured that would probably be my best bet for finding what I was looking for and it would be a heck of a lot cheaper anyways. Sparkle velvet tends to go for anything from $10-$20 a yard. Yikes.

Luckily I found something at one of the local consignment stores that will suit my needs with only a little bit of alteration.


It's a size 12 girl's holiday dress. Most of the velvet is not glitter, though it does have a little bit of sparkle on the chest. I should be able to use the dress part without too much trouble (luckily I still haven't gained back all the weight I lost for the wedding), but I'll have to completely reconstruct the top. 12 year old girls don't typically have C cups.

I'll keep you all posted as I get this ready for next Friday. Happy Holidays!

-BG


Monday, November 14, 2011

Sorry: Interuption. Saucy Nurse Costume.

Slight interruption here. If you follow the facebook you'll know that I was invited to this lovely little shindig on Friday night. I was invited last tuesday which gave me three days to pop out a costume.


A challenge which I happily accepted. I didn't have a nurse's costume so hey, why not?


  I started with this shirt dress pattern. Butterick 5421. I used view D (blue dress) and went to town. Really all that needed altering was a little bit of shaping around the waist and some shortening of the length. I removed the pockets for time's sake and added a little bit of trim here and there.


I was pretty satisfied with it. Particularly the collar. Other than cutting the facing a bit too short it came out very well. My best shirt collar to date actually. Now if I could just figure out stand collars.


The only real problem I had was with sewing the ruffle on the bottom. I sort of kind of possibly sewed it on backwards for the party (which I did not have time to fix) and then I kind of sewed it on backwards again when trying to fix it for blog photos over the weekend. There wasn't much I could do to fix it the second time since I'd already lost too much length (don't rush kids, it f***s things up).

Sadly, this thing is short short short so I'll probably end up putting another layer of ruffle on the bottom eventually. The only thing I could think to do for now was bind my raw edges with some casing. It's okay, but not my best work.


But overall, quite satisfied and I was definitely a hit at the party.


 Just try to imagine this with some yarn hair-falls, pale blue contacts, a good smearing of white powder, white knee socks, my giant clonking white platform shoes, and some black eye shadow. I'll have to see what I can do about getting the whole outfit together and snapping a few photos since this really doesn't do it justice.

I would show you photos from the event, but unfortunately about 10 minutes into the party the camera crapped out so I didn't actually get any photos of myself so here are some photos from their facebook page of some of the other fantastic costumes.


 Thanks for reading, lovelies! See you soon!

PS. Don't forget to follow Bomber Girl's facebook for updates on current projects, free patterns, and more. Peace!


Monday, November 7, 2011

A year of backlog: Let's continue the January Dress posts

Heeeeeeeeeeeeey Readers,

Long time to chatty chat. As you all know very well at this point due to the wedding I've been MIA for a loooooooong time. Not that I haven't been doing projects, taking tons of photos, and doing the general crafty craft business. In fact the last year has been a crafty overdrive. I started a new costume making business (more on this later), I may be about to start apprenticing under a corsetiere (super exciting, fingers crossed), and I handcrafted every inch of my wedding and wedding reception. So as a result I have a year of backlogged posts just waiting to be free!

So for the first backlogged post I decided to go back to a project I started many many moons ago. Namely the January Dress, a dress I was patterning after this fabulous vintage piece of amazo-sauce.


When we last left off I had only just completed the muslin. So onto the next step!


Step one was to underline the bodice pieces. I used Tasia's fantastic underline tutorial over at Sewaholic for this one.


I stitched a 1/4 inch in and trimmed the underlining to fit 1/8 of an inch inside the outer fabric. This worked fantastically and lays nice and flat.


In addition my desired color result was created. A white eyelet fabric with just the tiniest touch of ivory peeking through. Just a little bit of a vintage colored touch while at the same time allowing the white fabric to modernize the dress enough to make it wearable for all sorts of functions.


After underlining the step 2 was to dart the shoulders on the front and rear of the bodice. The darts help to build the breast cups on the front and add a nice little bit of detail to the back (pictured above).


I apologize for the mess in the above photo. I hadn't trimmed the threads yet. I decided to do the old pull the bobbin thread through and tie some knots trick. Holds just as well as locking the stitches in with the machine and makes for a much cleaner line on your darts.


See? Nice and clean. After the darts were ironed down in the direction facing the neckline it was time to add some facing. The pattern I used did not include facing so I had to draft it. Pretty easy to do. Just trace about an inch or so out from your shoulder line and neck line.

I decided not to underline the facing. I didn't really see a need to do so and it seemed to me that it was add a little too much thickness. As for the edges of the facing? I just pinked the edge since this fabric doesn't seem to unravel too badly.


On the first side of the facing I combined the shoulder and neck facing into one piece. You can do this for almost every sleeveless bodice, but unfortunately this was one of the few where it didn't work out. The eyelet fabric was just a little too thick and made the sleeve poof up a little too much. No problem though. A very quick fix. I simply sniped down the center and the results were one thousand times better.

Stay tuned for more January dress tomorrow!

Much love,
BG


Tuesday, November 1, 2011

Guess who has a new last name


Well it's official! I want to thank you all for sticking with me while I handcrafted my special event. Lots and lots to share with you now that everything is said and done and we are back from the Honeymoon in Japan!

-BG

Monday, August 1, 2011

Wedding Business: The Bridesmaid Dresses

So I suppose with all my excuses about not updating as much due to wedding business I should probably start putting my money where my mouth is and actually show you what I've been doing all these months.

First up, the Bridesmaid Dresses. I would show you my wedding dress, but as it's staying a secret from Mr. Fiance I'll just have to post about it the day after the wedding... which is 8 WEEKS AWAY. Holy what? Did I just write that? I did. There's so much still to do! Darn handmade weddings...

Anyways, we'll worry about that later. Back to business here. First the girlies. When I first started discussing the wedding with Mr. Fiance he let me know that he really wanted to wear tails. He is one of the few men I know who owns his own tuxedo and wears it on a fairly regular basis for networking and so on. He wanted to wear something special for his wedding and so this whole idea of the tails was born.

This of course meant that the girls (including me) would need to be in full length gowns. Let me tell you how fun it is to find a flattering full length gown these days, particularly one that would go with my somewhat unique wedding gown. So the search began.

In January I flew up to New York where my mother and sister reside. We planned a day long shopping trip that took us all over Saratoga Springs and the surrounding area. We met up with one of my Bridesmaids, Bradlea, and another good (and honest) friend of mine, Jen, and off we went.

Bradlea and my sister tried on mmmm..... maybe 25 gowns or so for me. Honestly it probably could have been more considering we spent an entire 8 hours shopping. Eventually we stumbled across this little gem by accident. I only pulled it out of the rack because it happened to be the only sample in the color I was looking for (an iridescent non-blingy gold) and I wanted to check the color on the girls.

The Beautiful Mrs. Bradlea who was just married in November. She is modeling Bari Jay 233.
The dress was really cute, had sleeves (a key criterion for me), and was sampled in the exact color I wanted. Someone was telling me to buy this dress. We tried on a few more dresses for giggles, but I had pretty much made up my mind after seeing this one. A few days later I had my girls go ahead and order this style.

Here are the images used on Bari Jay's website. This poor girl has been photo-shopped to within an inch of her life, poor thing. I don't think these images do the dress justice at all, but it is enough to give you a general idea of what the gown looks like.


Mr. Fiance if you are reading this stop now. I'm about to give away a spoiler here. For everyone else, another key reason why I enjoyed these dresses is they have the same short quasi train in the back as my gown. They match perfectly with my dress down to the weight of the fabric. These dresses are chiffon, my gown is organza so they both have a very light airy quality to them. I am very excited to see these on my girls come October!

Friday, July 29, 2011

So let me tell you about my week.

So if you follow the facebook or twitter feeds you'll probably have some idea of what's been going out at Haus of Bomber Girl this week, but I promised to give a little more detail in a post so here it is.

Rewind, Saturday. We help future inlaws clean out attic of the house they are putting up for sale. Doesn't sound too bad except for the fact that we are in Georgia in the middle of a heat wave and the attic has no air conditioning. So we spent all day working in a 115 degree (no joke) attic. All we were really doing was getting out Mr. Fiance's things from when he was a child so that they could be sorted or tossed. Mr. Fiance worked on attic removal and I was on bring-things-downstairs duty.

It worked out pretty well for us except for the fact that we were both a little ill at the end of the day. He from mild dehydration--we kept a supply of water up there for him, but he just couldn't drink it faster than he was sweating in that heat --and I from constant temperature changes as I went up and down the stairs all day.

Mr. Fiance's father, or as I will now call him Mr. Fiance Sr. was a riot and kept our spirits up. I've gotten so lucky as far as inlaws go. I get along so well with my soon to be dad-in-law and my soon to be mum-in-law is my shopping buddy already. In any case Mr. Fiance Sr. was more than happy to explain every strange object we came across from Mr. Fiance's childhood included a strange game involving winding a plastic dog's tail and plastic ticks. I didn't get it either.

At some point during the day we discovered some old book cases that Mr. Fiance senior said we could have if we wanted them. We wanted them. Only problem? The movers could only transport them on Tuesday and the only room they would fit in happened to be the unpainted guest room. These things are heavy has heck and they screw into the wall so once they were in they would be in forever. That gave me Monday to paint since Sunday was already dedicated to more sorting.

Let me tell you how much I like to paint rooms in one word - meh. I don't dislike it, but it's a lot of work and I am not a fan of paint fumes. We tried using low VOC paint in a few of the rooms in our house, but the coverage was pretty poor and it tended to dry too quickly. On top of that there is a very limited color selection. So we decided to go back to regular old house paint for the time being. If we decide to have kids sometime soon of course we'll use the VOC free stuff again, but seeing as we're not planning on that for years I should have the whole house painted in time.

Anywho I'm not a huge fan of painting. Paint fumes aside I think mostly because I did it so often when I was working in exhibitions at a photography museum. When you have to repaint a giant gallery space every two months or so the charm really wears off. That leads to a lot of procrastination on my part. I have meant to paint the guest room ever since I moved into the house, but never really had a reason to. Well now I certainly had one. So let me tell you how Monday went.

8:30am: Drive to hardware store. Buy Paint.

Luckily I had the color picked out already so I didn't have to worry about that. I went with a lovely color called "Nutmeg" which was not the color of nutmeg, but it was still a lovely shade of chocolate brown.

9:30am: Drive home to this room which is currently full of wedding decor and junk.


I was a little embarrassed to show these pictures, but I wanted you to know what I was up against. Our house has been in a constant state of construction lately and things seem to get moved from room to room if they don't have homes yet. As evidence I moved pretty much everything that was here sans towels and put them in the dining room.


10:30am: Finish cleaning room and vacuum floors.


This blanket is my pride and joy. Seriously, I would go back into a burning building for this thing. I knit it my senior year of college while completing my thesis. I literally finished sewing in the ends of this blanket the day of my graduation. It took me six months to make this thing and it is my favorite knit blanket by far.


10:45am: Move my nemesis.


I hate this TV. It serves no purpose other than taking up space. It can't play DVDs without routing it through a VCR because it only has a cable jack connector on the back. It's not super heavy, but it's big and bulky and a pain in the butt to lift. The terrible thing is that this is the nicest TV we have in the house, but I still hate you 1990s TV.

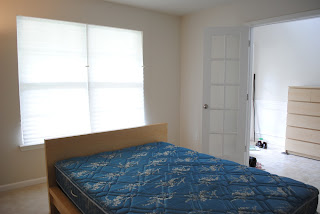
11:45am: Try to move bed, find it too heavy. Remove mattress. Move furniture.


This is the infamous "Tornado Hiding Under" mattress. It is really bendy and not fun to move by oneself when one is a 100lb 5' tall girl. To me it weighs a ton, but at least it's only a full so it was manageable.


If you don't have these things you need to get them. Fantastic invention. I didn't have to disassemble the bed frame or anything. Sweet.


Moved IKEA dresser and weird side table that totally doesn't match the decor, but whatever. We're a young couple. We're excused.


12:00pm: Move all tarps from upstairs office that we just finished painting last week to downstairs. Jury rig them to fit over the bed so I don't have to remove it from the room. Selectively add painters tape.


3:00pm: Take small drink break for a diet coke. Let paint dry 10 minutes.

4:30pm: Finish the cutting in.


The room has a window and three door frames to paint around.. It took me a long freaking time to finish.


5:30pm: Finish applying first coat of paint.


Looks pretty good, but definitely showed the problems with the builder's painting job. There were three different types of paint on one wall. One type took way longer for the brown to dry over. Then there were the dried paint drips and blobs, the poor execution of said paint job, and the fact that the ceiling is higher in some parts of the room than others. Thanks for a quality job builder guys.


Afterwards I finally took a lunch break and ate for the first time that day. I don't remember what I had, but I'm sure it was good. I think it might have been an entire tub of coconut milk yogurt mixed with frozen cherries and flaxmeal.

7:30pm: FINALLY finish the stupid painting. Take shower. Not totally sure how I managed to get paint all up the back of one of my arms, but at least the latex paint comes off pretty easily in the shower.


Next day: Get book cases at 8am in the morning. They look sweet.


Pat self on back, vow to do no work for the next three days.

Friday, July 22, 2011

A Brief History of Men's Shirts from 1900-1949

Something I've always been interested in as you know is the evolution of clothing. I'm always curious to know things like how this:
approximately 1840
Turned into this in a period of 20 years:
1860

Now granted men's fashion has changed a bit more slowly than women's fashion in the past few centuries, but we can all agree that it has still evolved fairly quickly.

1810
1910
2010
(Nancy note: This girl lived the next town over from me and went to my rival high school at the same time as me. She was even on our rival cheerleading squad. Please don't think any less of me...I promise no one else from that area talks like her.)
But all joking aside I could write a book on how men's fashion has changed in this century alone, but what I'd like to do today is talk about how a man's everyday shirt has changed since the beginning of the last century.

1900s:
Ca. 1900s (1907ish)
Here's an example of a pretty typical late 1900s shirt. There is a high detachable wing collar (rounded) and two cuff options. The sleeve plackets are pointed and the yolk is straight. This is what is called a "coat shirt" because if the fact that it opens all the way down to the bottom and can be slipped on like a coat.


The type of work shirt you wore, like today, depended on what you did for a living. Business men typically wore suits and white shirts of finer material while day laborers wore more colored shirts of much sturdier fabric (color hides stains and dirt). A man had many shirt patterns and colors available. Polka dots, double stripes and single stripes were popular as well as the traditional white.

Both acceptable shirting fabrics. 

Collars came in detachable variations like the shirt pictured above and rarely softer attached collars. In the early 1900s collars were much more popular as they increased the longevity of the shirt. Shirts were still yet to be mass produced and a gentleman typically had less than a weeks worth of shirts in his possession at any given time. You will also note above that the collar is quite high. This is left over from the late Victorian era, but as we approached the end of the decade shirt collars start to shrink in height.

1910s:

 late teens (source)
So this is a Negligee shirt or what I would call a semidress or casual shirt. It is not a night shirt. That's something completely different. (Nancy note: the term negligee doesn't become associated with bedroom attire until 1930s.) This shirt also has a detachable collar option and what's called a front-plait opening down the front. The placket ends a little more than midway down the shirt and the shirt is meant to be slipped over the head, though the pattern does give you the option to make it a coat shirt. The neckline is still quite high, but lower than the previous shirt. The rounded collar was still the more popular style at this time, but it would be going out of fashion shortly.

There are two versions of the shirt pictured above. The far left is the negligee version, the center collarless version is what's called an outing shirt. This shirt could also be considered a work shirt if it was made with a sturdier fabric. The type of shirt at this time was determined mostly by the fabric used. Lighter fabrics for casual wear, slightly heavier fabrics for casual wear, and sturdier still for work shirts. The pointed yolk was typically found on casual shirts like these, but on occasion it would pop up in more formal wear.

From a Guild to Making Shirts reprinted 1928 

Many colors were still popular at this time. Stripes, half stripes, and even on occasion checked fabrics were worn.

1920s:
Early 1920s
This shirt features a slightly more modern look. You still have the option for a detachable collar, but the main image of this pattern shows a pointed attached collar. Even the detachable collar is slightly pointed. The shirt again gives you the option of coat shirt style opening or front-plait style opening. There are two cuff options including a detachable reversible soft cuff.

During the 1920s the silhouette of the shirt begins to change due in part to improved manufacturing techniques. Shirts become more fitted, with straight fitted sleeves. French cuffs are the norm. Pointed soft attached collars become more and more widespread thanks to the invention of the home washing machine. Rounded detachable collars are still popular among the older population, but for the trendy folks pointed collars become the normal shirt for business wear. They were secured with collar studs or pins and a tie. Detachable collars are still popular among day laborers for their ease of care and increased shirt life.

1930s:

source
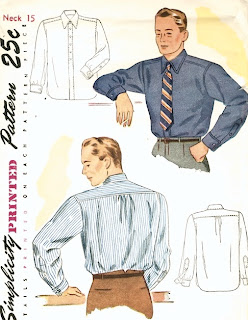
Now we're cooking with gas, as they say. This is really starting to look like today's men's shirt. This pattern only gives the option of the coat shirt opening. Plait-front shirts are pretty much obsolete. The placket still ends quite high on the shirt, but this is in accordance with the pants style of the 30s in which a high waist was preferred.

French cuffs, pointed sleeve plackets, and a longer shirt collar point are all features of this particular shirt. Also popular at this time. Collar stays!


Which were really more like tie clips, but still amazingly effective. Clip stay to tie and each side of collar and voila! Collar stays put all day long. Genus says I.

1940s:

The 1940s bring with it an explosion of different styles of shirts. Shirts become more and more casual. Short sleeve shirts are very stylist for casual wear, sport wear and even work wear.


Fabric choices explode. Flannel, cottons, rayon, prints, prints, prints, and more prints all become popular for work and casual wear.


Western shirts become popular in the late 30s and into the early 40s. This is caused the increased popularity of western movies and stars like John Mack Brown, Red Berry, Harry Carry, Jr. and more. I have a secret love for these, but Mr. Fiance has promised me he will never wear one. Bummer. 


The button down business shirts stay about the same. Detachable collars disappear and the softer pointed collar firmly cements its place in men's fashion. Shirt tails become shorter and plackets extend as the waist on men's pants lowers.

And that, my lovely friends, is that. If you found this helpful drop a comment in the comment section below. Next post: 1950s-1960s.


If anyone was confused by some of the terms I used in the post here's a helpful diagram.

source


Additional References and Some Good Supplemental Reading Recommendations: