Friday, May 28, 2010

Vinspiration Anyday: 1970s Print Ads

First off. A few more Ruby Shorts look-a-likes from one of my favorite vintage stores Heyday! UK.  I will warn you that their things are not $25, but they're great for some inspiration. Of course I was ordering from this shop only before my $25 challenge. I am pleased to report that since starting this blog I have not bought one new dress, shirt or skirt. So far I'm still on the $25 handmade track, although looking at these blouses almost made me relapse into my days of store bought.


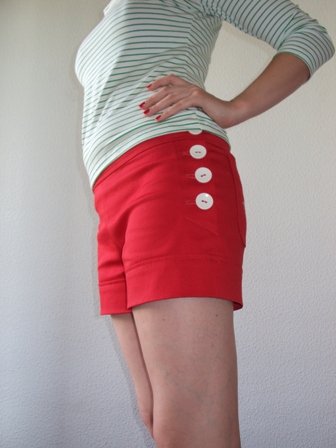
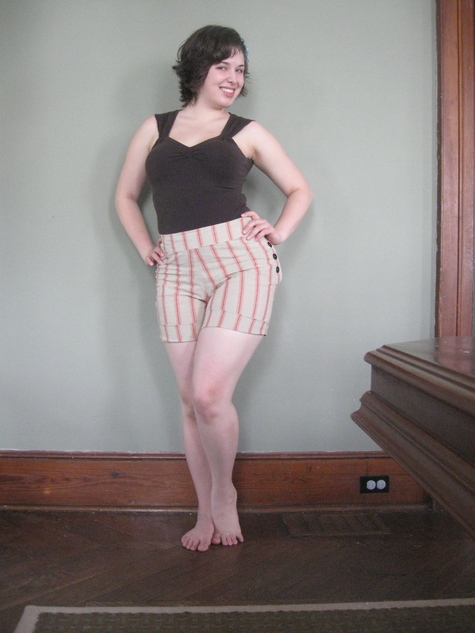
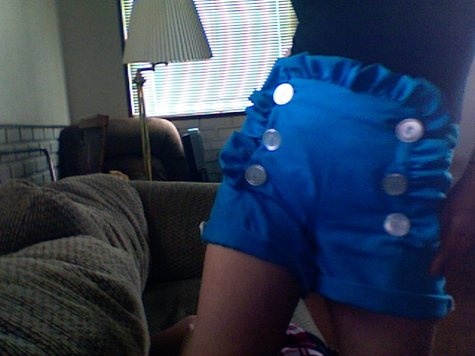
That's it. I've decided that from now on everything I make will have white buttons down the side. I never liked pants or shorts, but add some buttons and I am sold! Those $0.40 buttons I bought? Totally worth it. I may have to make myself a tie blouse like that now. Picture Ruby Shorts, cute tied blouse, hair scarf, large sunglasses, some fabulous shoes, big red lips and a devil may care attitude. Perfect for summer if I do say so myself (and I do).

Has anyone else noticed that the Brits have the best vintage reproduction stuff? Anyways, onto the item of the day, some Vinspiration! This week I picked some fabulous 1970s outfits from some Groovy 1970s magazines. Did people actually say groovy in the 70s or is that an urban legend? I'll have to ask my Mama.

I have a small fascination with the 70s, I guess because that was really my parent's era. Mom and Dad both graduated high school in the 1970s and it really was a time when clothing was fun, flashy and eclectic. Sure it doesn't have the classic, polished, elegant look of the 40s and 50s, but there's just so much charm in a 1970s print or a bell shaped pant leg. The 70s were alive and vibrant!

Farrah. Was there ever a bigger, lovelier star of fashion than Farrah? That sweater just looks so comfy and flowy. Love the bell sleeves and the great wide neck. Not quite sure what's going on with the purse hanging around her neck, but she looks comfy and stylish. She'd fit right in with the recent trending towards over-sized sweaters and cowl-necks.

I really love that plaid jacket with coordinating trousers in the background there. The turtle necks are probably not something I could ever get my Beau into, but I do love the cut of the fitted trousers and jackets. You don't see much fitted clothing for men these days. Even fitted shirts are hard to come by. I think the over-sized belt buckle is a little silly, but has a lot of charm. It's very fun.

Before anyone says anything. Climax is the name of a brand of clothing. Nyesta is a type of fabric and very Synthetic if I had to guess. But lets move past that and look at the drape of these dresses. Gorgeous! I love white over the shoulder dress with the great ruffled detail down the side. Pink is fabulous too, but probably not so much on a busty girl. The lines of the dress are great, very clean and classic. But wait... that dress is the color of my Ruby shorts... maybe they are 1970s afterall?

Another advertisement for synthetics, but who cares. I love a good pinstripe, if you can call those pants that. Mens pants in print are just so fun. The 1970s were definitely a great time for men's fashion. So many fabrics, colors and designs to chose from. Men weren't limited to jeans or the straight cut trouser. They had options! And they rolled with it. The one thing I'm not quite sure about is whether this is business casual or just casual? Is this a weekend outfit or no?

These two are just too cute. I couldn't resist adding this ad. I love the girls cute hair cut. Her collared shirt and sweater combo are super cute. So cute! 

and finally...Versace! Circa 1979. Not the most memerable of the Versace looks, but interesting. You can definitely see the beginnings of the 80s silhouette here. Particularly in that red jacket in the middle ground there. I would also guess that this and other high fashion of the late 70s is what killed that 70s look that we all associate with the era and moved us into the 80s pallet. Fashion always starts with the top designers and trickles its way down to us.

Hope that was fun for you! I had a blast. The 70s are always a good time. Hoping to get most of my work done on the Ruby Shorts tonight. I would reaaaaaaallly like to wear my Ruby shorts for Memorial Day and todays the day to make that happen. I've got lots of time to catch up from yesterday's no-sewing and to get ahead for tomorrow. I won't have sewing time tomorrow as I just found out Beau and I will be guests at an event welcoming one of our brave wounded soldiers home to GA.

So the "new new" Sew-a-Long schedule for me looks like this.
Friday: Pockets and sew everything together!
Saturday: Nothing!
Sunday: Whatever else!
I am not good at following designated time tables. Gah.

And for those of you who don't know, Jo-ann Fabrics Memorial Day Sale starts today! I'll be cruising out there after work to snatch up some good deals.


Some of the deals they're currently running are 50% off all home decor fabric, 50% off outdoor canvas, and 30% off all sewing notions. Frugal gals unite.

Thursday, May 27, 2010

Ruby Sew-a-Long Day 3: Cut out fabric!

Day three of the sew along was cut out fabric day! On the advice of some of my fabulous commenters I went with the pink Polyester/Linen Blend. (By the way, this stuff is VERY stretchy. Hope it doesn't stretch out and give me saggy-butt later in its life.) This is a better picture of the color. Yay natural light.


Much prettier than the one I posted yesterday I think. I washed and dried my linen blend while I fixed some of my alterations on the pattern. Then I set to pressing. The fabric actually washed fairly well. Not too much fraying, which is a good sign for the sewing to come.


After it was all nice and pressed into shape I started to channel my Grandmother. You see, my Grandmother is capable of using half the recommended amount of fabric every single time she sews, just by moving around the pattern pieces. So I set to work. And BOO-YAH is all I'm saying. See that tape measure in the picture below? That's the one yard mark on 48" width fabric.


The pattern calls for 55" fabric, but I figured it could be done in less than 1 3/8 yards of that. Little did I know it could be done in less than one yard of a smaller width fabric. (Just to note here, I cut out a size 34"/36" combo and I'm not making the belt.) As you can see I still had to cut out pattern pieces 3 and 4 once more and 8 is not pinned down. That's because 7 & 8 are only required to be cut out once, so I cut out 7 double and then cut out 8 on one of the two pieces. I promise you it all fit in one yard of fabric. I can now call these shorts a one yard wonder!


And there you have all the pieces cut out and ready for sewing. I checked and I almost have enough fabric to make a second pair of shorts if I make them a little more Daisy Duke. Which-- lets not kid ourselves --will probably not happen. Here's the sanctioned sew along schedule for the rest of the week.

Thursday - Steps 6-8 (pockets)
Friday - Steps 9/10
Saturday - Step 11
Sunday - Step 12, done!

I will probably not be following this schedule, since tonight I have a previous knitting engagement. Instead my week will look something more like this.

Thursday - Nothing!
Friday - Pockets!
Saturday - Sew everything else together!
Sunday - Button holes and button stuff!

So no sew-a-long update tomorrow, but since I didn't do a Vinspiration Tuesday this week I'll do some Vinspiration tomorrow instead. See ya!

Wednesday, May 26, 2010

Sew-a-Long Day 2: Picking Fabric Day

First thing I did yesterday morning was blow up the images from my Ruby pattern. Burda patterns have a nasty habit of making their images teeny tiny. So I took care of that. Here's before..


and after!


Much better. I even added notes and scribbles. I seriously recommend that you also do this fellow Sew-a-Longers. It makes a big big difference. I can almost tell what's going on now!

Afterwards I went off to the fabric store to find my $25 worth of stuff. I initially wanted linen, because it's light and breathable and because the Ruby Shorts pattern recommends it. As I thought about it some more however I started to change my mind. Linen in general tends to be a little expensive and unless I could find something hiding in the clearance pile I didn't want to have to commit to $9-$16 per yard. So I figured I'd pick up a yard and a half or so of a nice cotton instead, still breathable and still machine washable.

BUT as luck would have it I walk into the store and all linens and linen blends were 50% off!! What? Someone was smiling down on me as I quickly dashed to where the linens were housed. Apparently I was the last person to find out about this sale however, and most of the section was picked out. I was pretty annoyed to find some great prints with less than a yard on the bolt. Seriously? You put that back on the rack? But I did manage to find this cute pink stretch linen blend solid.


Quite retro in color and definitely has the 40s look I'm going for. I bought myself a yard and half for $6.98. Then I went off to find the buttons. I found some super cute white buttons (also pictured above) for 40 cents each. Ouch! But they were so perfect. After seeing the shorts I mentioned in my first Sew-a-Long post I knew I needed white buttons.


I picked up a spool of polyester thread for $2.79, about a yard of fusable interfacing for $1.89, and $0.91 for GA state and county tax bringing my total for the shorts to $16.18. I have never been a stasher and before I started this $25V project I had no stash to speak of. I bought fabric as I needed it and sewed with it right away, hence why I have to pick up things like interfacing each time I start something. I have slowly begun to realize the appeal of buying in bulk however and you will more than likely begin to see more bulk buying out of me in the near future. But for this project I'm still sticking to my old tricks, just buying what I need. Or am I?

In true Nancy fashion as I was dashing by another of my favorite fabric stores this morning I found THIS.


Not so 40s, but holy cuteness! It's a 100% cotton linen look fabric in the cutest shade of purple for $6.50 a yard. I couldn't stop myself! Before I knew it I was in the store, bolt in hand, having the lady cut me out another yard and a half. Best part of this trip was the thread being on sale. $2.15 on a spool of thread that normally runs $3.49. If I made these shorts instead my total would be $19.62 with tax. A difference of about $3.00 to the pink version.  So now I can't decide. Retro with retro looking fabric or retro with more modern print fabric? Gah. I'm so bad. Help me please!

Tuesday, May 25, 2010

Sew-a-long Update: Day 1

Started working on Lisette's Ruby Shorts sew along last night. According to the schedule Monday was the day to have our pattern cut out and assembled. It took me a little longer than I expected because this pattern needed to be printed out on a home printer and then assembled piece by piece. My printer is not all that great so there were slight differences in the page sizes making it very difficult to fit all the pages together smoothly. In the end I did a fair enough job.


I'm a hybrid size. The waist needs to be the 34" size, but my hips need to be the 36". So I scribbled some notes on the paper, which trust me are nowhere near the amount of pattern destruction I normally cause. I'm a serious note-taker and most patterns are left with tons of little cryptic writings all over them, practically filling up every available space on the instruction sheet or Deltor.


This is just step one, since I took this picture I filled up the big space in the middle with math. So now you all know my measurements. Hopefully this will not come back to bite me. I'm a little bottom heavy, but I like to say that it's just the Junk in my Trunk. The next step was to fit the pattern. I roughly chopped out all the pieces and then when back and fit them to my size.

 
Thank you multisized patterns for making pattern adjustment incredibly easy. I chose not to shorten the shorts, even though the pattern is intended for someone 5'6". I wanted them to look a little more vintage, so I wanted the waist to be long and as well as the legs. I actually considered lengthening the legs a few inches, but decided against that. Long shorts will just make me look short and squat. So I stuck to only fitting the waist. I'm not making a muslin of this pattern due to the time schedule so keep your fingers crossed and hope I made the right decision here.
  

I was a little upset to find out that the Husqvarna machine I was supposed to be getting back on Tuesday, then Thursday, is now going to be away for an indefinite period of time. Which is seriously frustrating, considering I joined this sew along fully expecting to be able to use my button hole attachment. Now I'm going to have to use my vintage Dressmaker 230 which has been slowly dying on me AND make handmade button holes. Ah well, c'est la vie. This will be a good last project for Dressmaker until I can afford to have her refurbished. (Sewing machine repairs are not under $25, in case anyone was wondering...)

So after doing all the chopping and cutting it's off to the fabric store today to pick up a yard and a half of fabric, some fusible interfacing, 8 buttons, and thread. All that in only $25! Wish me luck! I'm all powered up after having the best thing in the world for breakfast!


Yum! Half a cup of goat's milk yogurt from Whole Foods, frozen cherries, a handful of flax meal, handful of raw sunflower seeds, shredded unsweetened coconut, and a palmful of pecans! This is quickly becoming my favorite power breakfast, when I just don't feel in the mood for green sludge.

Thursday, May 20, 2010

Sew-A-Long!

Just joined my very first sew-along over at Vintage Or Bust. Lisette had a great idea to do a sew along of BurdaStyle's Ruby Shorts. And I love them! They are so cute, definitely vintage inspired and they require a very low yardage. I say that fits into the $25 Vintage Challenge quite nicely.

I've decided to make mine in size 34. The pattern requires 1 3/8 yards of fabric which is very budget friendly. I still question that yardage even. Maybe it's a little of my grandmother in me, but I feel like it can be done in less. Unless I want striped shorts, which I may after looking at some of these examples!


Cute right? I just love a good pair of shorts! The shorts themselves are very 60s, but the buttons really give them a 70s feel. Just look at Golightly Vintage's 70s vintage shorts for proof.


So cute! The fact that there's no fly on the Ruby shorts gives them even more of a vintage feel. I hate flies on women's pants and shorts. Do we need them? No. I much prefer a closure on the side so I am more comfortable when I sit. Just look at these great 1940s retro repro shorts from Hipnotique Vintage.


And I can think of a few vintage patterns the Ruby shorts remind me of.


In fact, I'm pretty sure the Ruby shorts are almost identical to McCall 6812 from 1947. Maybe I should call them 40s shorts?


I'm not normally a pants/slacks/short wearing type girl. In fact, I think I may only own one pair of shorts and maybe a pair of peddle pushers somewhere. But my Beau is an outdoorsie type guy. He's a fantastic canoe driver and I have been promised a ride down the river with Beau by Beau's father this summer. I think these would be great for such an occasion. To note, I'm not quite sure if Beau is in on this promise or not. Surprise Honey! These would also be great for things like Six Flags and roller coaster riding. Skirts are not appropriate for hanging upside down on the superman ride. This is a certainty.  

If you want to sew along with us go visit Lisette's Blog. She has a tentative schedule posted for the sew along. Sewing starts early next week so hopefully my sewing machine will be in working order by then. Would really like to post some pics of the magenta dress and start on my swimsuit!

Wednesday, May 19, 2010

Vinspiration Twednesday: Fortuny Gowns

Sorry, I'm a bad Nancy. I did not put up any Vinspiration yesterday. I have no excuse, work just got in my way. So here's your weekly Vinspiration. It won't always be photographs. Today I've decided to show you some beautiful vintage gowns from Mariano Fortuny. You can start swooning now, trust me.

Quick history lesson first. Fortuny is the inventor of the "Delphos Gown." These dresses were produced starting in 1907 through the mid-40s. They were originally intended to be tea gowns to be worn at home by the ridiculously wealthy for private entertaining. As time went on they became more popular as evening gowns. I pulled this excerpt from the Manchester Art Galley's website.

"Working from Venice from about 1900, Mariano Fortuny (1871 - 1949) created one of the most enduring neo-classical "looks" of the twentieth century. Fortuny gained an early grounding in historic fabric patterning and design from his parents who collected antique textiles, and who encouraged him to involve himself in designing for the theatre. In these costume designs for the stage, he often looked directly to models from the Greek and Roman classical past, predating his fashionable clothing designs.


After 1910, Fortuny worked as a couturier, patenting a number of new techniques, including his famous pleating style for silks (which he made up into "Delphos" dresses in direct imitation of classical styles). He also invented a type of polychrome printing on thick pile velvets, and a system of rotary stencilling. Worked from Venice, he also opened "artistic" boutiques in Paris and Milan, and maintained outlets in shops such as Liberty & Co in London. His outfits were always aimed at an elite luxury market, but they have since proved to be timeless, still sought after and worn today."

Mrs. Conde Nast is shown wearing one of the gowns. The image is dated 1907. I love the empire waist, the fine beading around the waist, the delecate pleats. This gown is beautiful beyond words and so timeless. I'll note that these gowns were intended to be worn with coordinating cloaks, shawls, or jackets as you can see above, but most museum collections display them alone so they can look a bit simple. Still, there's an immense amount of beauty in their simple elegance.

This gown is part of the collection at the Metropolitan Museum of Art I believe and dates from the 1920s. It's constructed of silk and decorated with glass beads and a simple cording. The color is gorgeous and the cut is so flattering. This is one of my favorites.

Here is another example of the Delphos gown. I don't know about you, but I have no doubt of what period inspired this particular gown. It dates from somewhere between the 1920s to 1940s and it is part of the Metropolitian Museum of Art's collection. I tried to research how the pleats were made in these gowns and the best I can find is that Fortuny used a series of heated rollers to set the pleats. Apparently the pleats were not permanent and often the gowns had to be sent back to Fortuny to have the pleats reset if they got wet or if they became flattened out around the bum.

More fabulous gold colored silk here. Yum. I could imagine a vintage inspired gown based on this made from some Gold Dupioni Silk, though I think the pleats might have to be omitted unless you're really ambitious.

I can just image how these dresses looked as the wearer walked. The fabric must have flowed so elegantly around her. This color is just absolutely breath taking. This ensemble dates from 1934. It is not a skirt and top set, it actually has a long sleeveless underdress under the tunic top. This dress is also from the Met's collection.

And this is probably my favorite of the dresses I've posted today. The blue satin silk is spectacular and this one is for sale. It can all be yours for $12,000. You may have guessed that this is not in the $25 Vintage budget, but a girl can dream.... It dates from the 1920s and I just love the belted waist.

Here's a close up of the famous Fortuny pleats, so you can really get a look at them. Just imagine how something this tightly pleated would have formed around the body. The image also gives you a close up of the beaded detail down the side of the gown. According to the seller of this gown those beads are not just for decoration, but are also used to weigh down the dress because it is so light and airy. Heavenly!

Monday, May 17, 2010

Lets talk Underwear!

Lets talk Underwear! 


No Really. Seriously and truly. As I've said before and I'll say it again, the first step to a great (not to mention authentic) vintage look is the foundation. Ever wonder why your vintage dress looks a little rumpled and puffs out where it's not supposed to? Having trouble getting that boxy 1920s look? Getting some rolls and muffin tops where you don't want them? If you're not wearing the proper foundation, that's your problem! 

So here's a very very brief (haha... brief) introduction to undergarments and more specifically shape. I borrowed almost all the undergarment images from Lara Corsets. You have got to check her out. She does some amazing work and has a fabulous collection of vintage corsets dating back to the 1700s. Really cool. 

Let's start with the 1910s. I know not many vintage fashionistas have vintage styled garments going back this far in time, but it's always nice to see the progression of style. I've tried to place a relevant pattern under each image of unmentionables so you can see how the undergarment determines the shape of the dress and not the other way around. 


This shape is achieved with corseting. Steel bones were most common until the beginning of world war I.. You can see that the corset is used to shape the body into a very unnatural shape. The hips are flattened, making the silhouette quite top heavy. The butt is also reduced giving the whole shape an off-balance forward leaning look. I would guess it was not easy to sit down in this type of undergarment. I've never worn one myself, but from wearing other long line corsets I'll just go ahead and say sitting was probably close to impossible and if you did manage to sit you weren't doing so comfortably.  


One WWI begins many women turn in their corsets to be used for metal for the war effort. The general shape of dresses and undergarments become much more natural (aka, less ridiculously smooshed). Corsets begin to shorten, hips are given a fuller shape. There's a short period where more emphasis is given to the waist than earlier in the decade. 


The 1920s arrive and dresses start to take on a much boxier shape. Boned corsets are thrown aside, hems are shortened, busts are bound! There's a real emphasis on a boxy look that de-emphasizes the overly cinched waist of the past century. Unboned shapers and girdles begin to be used to flatten out the whole body and give a nice smooth straight line under the garment. This is also the time of the mainstream appearance of the brassiere (not shown here) though it was little more than a camisole and offered no support. The 1920s brassieres worked the same as shapers, mainly serving to de-emphasize the breast and flatten the chest.


The 1930s are the dawn of the breast my friends. Woman are no longer flattening their chests and we see the introduction of cup sizes for brassieres. Breasts become more natural and curved. Brassieres are still very primitive and not very supportive. They do nothing to "push up" but rather they are used to "fill out" a woman's chest. The shape is a bit pointy compared to our modern standards.  Hips are still constricted with shapers, but the idea is to smooth rather than to reshape. Dresses still mostly have straight lines. The stomach down is still boxy. Undergarments keep this line flat.  From what I've seen one piece shapers and brassiere/waist down girdle combos seem to be equally popular, but the one piece shaper definitely gives you a cleaner line.


The 1940s give us better fitted bras and cups. The shape of breast becomes a little more pointy, but nothing near the bullet bra of the 1950s. In all honesty undergarments don't change much in this period. With a war on and fabric rationing in full effect I guess there wasn't as much room to experiment. Bra technology continues to improve, but at a slower pace than the decade before and after. Waist shapers are still used, but again mostly to smooth lines. By now the look for is natural feminine curves and a far cry from the forced shape look of 30 years prior. We really start to see more and more of the A line skirt and the idea of slimming the waist. 


The 1950s gives birth to a rise top the idea of lifting the "girls" up as high as possible. The bullet bra was born. Circular stitching around the cups formed the pointed shape. Not all bras were padded bullet bras. There were many styles with more rounded cups, but almost all still had the pointed 50s shape. Women are still wearing girdles and shapers. This is in a continued effort to smooth lines. However the overall shape of the 50s is all about curves. Curvy hips, well lifted bust, and a tiny waist. Va-va-voom. The bigger the better.


And the 1960s. Undergarments start going under some massive changes with the addition of Lycra and flexible underwire. Some bras at the time were actually coated with a layer of foam latex rubber. They held their shape well and could stand up on their own. They make for a very unique look let me tell you. As the 60s progress cups begin to soften out. The shape becomes rounder. The extremely pointed bullet bra falls out of fashion and the Girdles of the last twenty years start to disappear. They are replaced by power elastic foundation garments. Some of this is a result of the times. Bra burning comes through during the 60s and though not many women participate, the idea causes some big changes. By the end of the 1960s and early 1970s our modern undergarment shape has been mostly formed. The idea that clothing should fit the woman and not that the woman should fit in the clothing seems to be the general consensus. Viva la liberte!